Tuesday, March 29, 2022

Gentlemen of Fashion (La Mode, 1832)

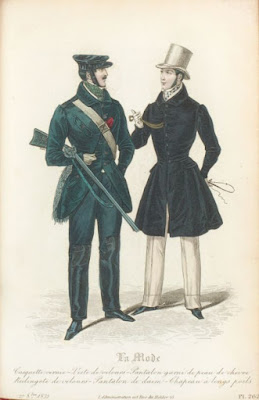
 J.C. Flügel called it "the great masculine renunciation", that is, the early nineteenth century abandonment of colour and ornament in men's dress.  That's not to say that men's dress couldn't be stylish —as depicted in these fashion plates from La Mode below.

 
Here we have one gentleman on the left wearing an early version of the frock coat, another on the right in a double breasted tail coat.  Both were acceptable forms of daywear in the 1830s.  The man on the right wears his coat flung open to display his patterned waistcoat, also nicely framed by his wide revers.  The outfits are not yet what we'd call suits, as the coats are worn with lighter, not matching trousers.  They are accessorised with high hats, canes, and fancy neckcloths worn over high collars.


This plate depicts two gentlemen in sporting gear.  The man on the left is dressed to go shooting (complete with natty cap and hunting belt), while the gentleman on the right is ready to go riding (as shown by the riding crop he is carrying). 


At first I thought both these gentlemen were wearing dressing gowns, but then I noticed the hat on the mantelpiece, and the buttons on the garment worn by the gentleman on the left, I realised that he was wearing a form of long overcoat ("reddingote" in the French caption, from the English "riding coat").  He's clearly a man-about-town dropping in to visit his friend in the velvet dressing gown on the divan at the right.  The man on the right is also wearing some kind of cap, possibly a smoking cap used to keep the smell of tobacco from permeating the wearer's hair.

All the models have neatly trimmed and styled facial hair, an intermediate step between the clean-shaven faces of the previous generation, and the wild whiskers of the mid-Victorians!


(Images from the Bunka Gakuen University Library.)

Tuesday, March 22, 2022

Vanity Fair, March 1959


On the cover of Vanity Fair from March 1959, a suit in cheerful pink tweed by Windsmoor (for sale at 13 guineas).  It's just the thing for those in-between days—spring in the Northern Hemisphere, and autumn in the South!

Sunday, March 13, 2022

"Wintertime Millinery" (Fashion Service, Winter 1925-26)

 In the 1920s, no smart outfit was complete without a hat.    The winter 1925-26 issue of Fashion Service had one for its readers to make.

Early predictions of more elaborate millinery for winter wear are being borne out in every detail of fabric and trimming.  Winter hats are large, graceful, well-trimmed, and decidedly ornate with the glitter of jewels and of gold, copper, and silver brocade.
Designed to complete a smart afternoon or dress-up costume, the model shown in side view on this page and in front view on the next page stresses these new features.  The brim, with its side slashes permitting the wreath of flowers to continue through to the under facing, shows a tendency to assume the task of trimming as well as to balance the flared skirt of the present mode.
The slashed-brim effect, introduced this season, does not mean just cutting a slash in a regulation brim; rather, the brim is made in sections and the slashes are fitted together, thereby making a pliable and substantial fabric brim, such as shown here.
Developing the Brim Pattern.—To develop the pattern of this two-section brim, lay a piece of tissue paper over Fig. 1; which is one-half of the back pattern, and trace the outline; then trace the outline of Fig. 2, or one half of the front section.  After obtaining a perfect outline of these two figures, marking and lettering them as indicated, cut around the outline.


For the back-section pattern, fold a large sheet of tissue paper and lay Fig. 1 with the end ab, or center back, on the fold of the paper, and pin secure; then cut along the line bc, or the outer edge, and the curved line cde, or the side slash.  Trace the curve ae for the inside headline size.  Next, continue line ab and curve cde by 3/4 inch and indicate a new line everywhere 3/4 inch from line ae, to allow for tabs around the head-size band.  A pattern of one half the brim or the back section, will then appear as in Fig. 3.
For the front-section pattern, pin Fig. 2 with the line ab on the fold of the paper, cut along the lines bc and cde, and trace curve ae; then allow the 3/4 inch margin beyond the line ae as for the back section, and the pattern of the front section appears as in Fig. 4.
Lay the patterns on a piece of netine with the lines ab on the straight of the material and cut around the outer edges.  Then slash the tabs to the head-size line.  Before joining these two sections together, bind the edge of the side slashes, as at cde on both sections, with a bias of crinoline.  Then lap these sections, as shown at a, Fig. 5, making the lap 1/2-inch wide, and pin secure.  Next, attach the edge wire, as shown at b.  Also, apply a ribbon-wire head-size band.
Making the Hat.—To cover the brim, lay the pattern on the fabric as directed for the frame and cut, allowing 3/4 inch around the outer edge and sides for turning over the edges.  Lay the cut fabric over the front section of the top brim, stitch secure around the head-size, and then turn it over the outer edge.  At the joining on the sides, make a tiny slash in the material just inside the edge and work it neatly over the wire and over the edge of the slash.  Cover the back section in the same way, but at the side slash turn the material over the edge for a finish, as at a, Fig. 6.
Before attaching the under facing, apply the maline transparent extension flange around the outer edge.  To make this flange, double 1¼ yards of maline over a 46-inch steel wire.  Run a shirr string along the raw edges, draw it up tight, and steam to remove all the fulness.  When thoroughly dry, cut the string, remove the wire, and lay the maline circle over the under facing, allowing it to extend out about 1 inch. Pin as at a, Fig. 7, lapping it at the back, as at b.  Stitch it around the edge, as at c, and cut away the inner portion of the maline as at d.  Then attach the under facing as directed for the top, finishing the outer edge with a cord and slip-stitching the edge of the slashes.
The oval crown is covered plain by drawing all the fulness out on the diagonal points and stitching it around the base.  Cut four pointed scallops wide enough to fit the base and extend to the top of the side crown, outline them with a loose-edge cable cord, and apply them to the finished hat on this page.
A velvet-covered cable cord finishes the base of the crown, and a wreath of metal flowers with ribbon centers extends across the front and through the slashes on the sides, ending on the under brim.  The limpness of this brim permits it to be shaped or adjusted to suit the individual style of the wearer.  Some desire an easy roll at the left side, while others prefer the brim to droop down on both sides.
(I scanned these diagrams at a fairly high resolution, so if anyone wants to attempt this pattern it should be possible to print them out and make use of them.  Maline is a fine stiff net with a hexagonal mesh, usually made of rayon or silk.  For those only used to the metric system, an inch is equal to 2.54 centimetres, so 3/4-inch is 1.905 centimetres long.)

Thursday, March 10, 2022

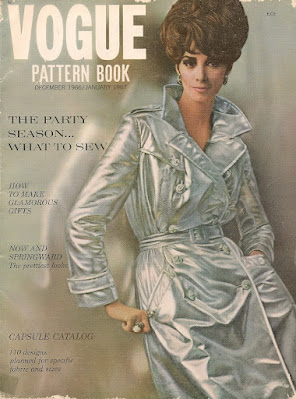
Vogue Pattern Book, December 1966-January 1967

 With an early winter snapping on the heels of an Australian summer that never quite was, I think it's time to look at coats—like this dazzling specimen below.

Vogue pattern 6970 is for an evening coat in "shimmering silver... with classic trench coat lineage".  It's made up in nylon with a Thermolam underlining.  Very sixties... and dig the model's funky beehive hairdo!

Saturday, March 5, 2022

"How To Put On A Corset" (McCall's Magazine, August 1908)

 This one speaks for itself!

National Cloak & Suit Company, 1908

 Much depends on the way in which a corset is put on.  The following hints may be useful:
Fasten the abdominal hooks first, lifting the body, with a long breath, at the same time, and holding the head well back.
After the top of the front is hooked, draw the looped laces from eyelets slightly below the waist, pulling the bottom of the corset much tighter than the top.
Through this simple means healthy breathing is permitted, for bodices are so loose that it is only at the waist and hips the figure needs to be held taut.
To keep the corset in good shape when off the person, many women use a block of wood, round which the corset is wrapped tightly and kept in place on the block with a ribbon or pins.  It is then wrapped in tissue paper to preserve cleanliness, and put away perhaps in a drawer faintly scented with orris-root.  There is no better perfume than orris-root for all the secret matters of woman's dress.

Tuesday, March 1, 2022

100 Years Ago (The Delineator, March 1922)

 For March I've decided to look at some typical fashion trends from 1922—as illustrated by these two day dresses that were available in Butterick patterns.  And since a picture paints a thousand words:


3584—[left] Latticed fabric trimmings on loose side panels creates a new version of the uneven hemline, and a new finish for fashionable wide sleeves.  The straight skirt of the dress is attached to the waist at a low line.
 3526—[right] Front and back panels are independent features of the slip-over dress... Kimono body and straight skirt which may be of a contrasting color meet at a slightly low waistline.  The dress closes under the left arm and may have a long body lining.

All the women's patterns illustrated in this issue of The Delineator share this loose, low-waisted silhouette.  Wide sleeves seem to have been popular as they appear on a majority of the garments.  The use of panels, long over-tunics and side-draping to give the impression of an uneven hemline is also common, especially on the more "dressy" dresses!

(The complete magazine is available on the Internet Archive.)